Table of contents
Generic OS Installation
- Insert OS installation media into one of the USB3 ports (blue on Thinkpads). For certian OSes , the Heads boot process supports standard OS bootable media (where the USB drive contains the installation media which as created using
ddorunetbootinetc.) as well as booting directly from verified ISOs on a plain old partition. For example, if the USB drive has a single partition, you can put the ISO image along with a trusted signature in the root directory:
/Qubes-R4.0-x86_64.iso
/Qubes-R4.0-x86_64.iso.asc
/Fedora-Workstation-Live-x86_64-27-1.6.iso
/Fedora-Workstation-Live-x86_64-27-1.6.iso.sig
/tails-amd64-3.7.iso
/tails-amd64-3.7.iso.sig
Each ISO is verified before booting so that you can be sure Live distros and installation media are not tampered with, so this route is preferred when available. You can also sign the ISO with your own key:
gpg --output <iso_name>.sig --detach-sig <iso_name>
Some distros require additional options to boot properly directly from ISO. See Boot config files for more information.
- Boot from USB by either running
usb-scanor reboot into USB boot mode (hit ‘u’ before the normal boot) - Select the install boot option for your distro of choice and work through the standard OS installation procedures (including setting up LUKS disk encryption if desired)
- Reboot and your new boot options should be available to be chosen by selecting ‘m’ at the boot screen
If you want to set a default option so that you don’t have to choose at every boot, you can do so from the menu by selecting ‘d’ on the confirmation screen. You will also be able to seal your Disk Unlock Key using the TPM allowing you to use ensure only a boot passphrase and the proper PCR state can unlock this yet.
(*) Ubuntu/Debian Note: These systems don’t read /etc/crypttab in their initrd, so you need to adjust the crypttab in the OS and update-initramfs -u to have it attempt to use the injected key. Due to oddities in the cryptroot hooks, you also need keyscript to be in /etc/crypttab even as a no-op /bin/cat:
sda5_crypt UUID=XXXXXXXX-XXXX-XXXX-XXXX-XXXXXXXXXXXX /secret.key luks,keyscript=/bin/cat
(Credit to https://www.pavelkogan.com/2015/01/25/linux-mint-encryption/ for this trick).
Installing Qubes
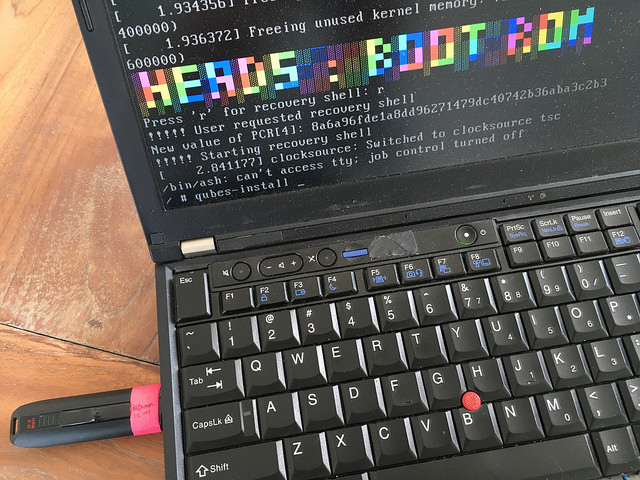
Plus in the USB stick with the R4.0 install media into one of the USB port and boot into USB mode (hit ‘u’ at the prompt), then boot using this option:
2. Install Qubes R4.0 [kernel /isolinux/xen.gz console=none]
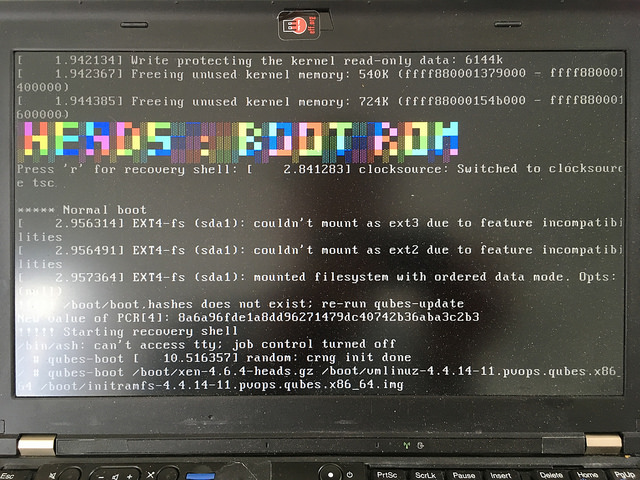
If that completes with no errors it will launch the Xen hypervisor from the ROM image and start the Qubes installer. The first few seconds are run with an archaic video mode, so things appear a little weird, but once the dom0 kernel initializes the graphics it should look right.

Use default QubesOS partitioning scheme for QubesOS 4.x
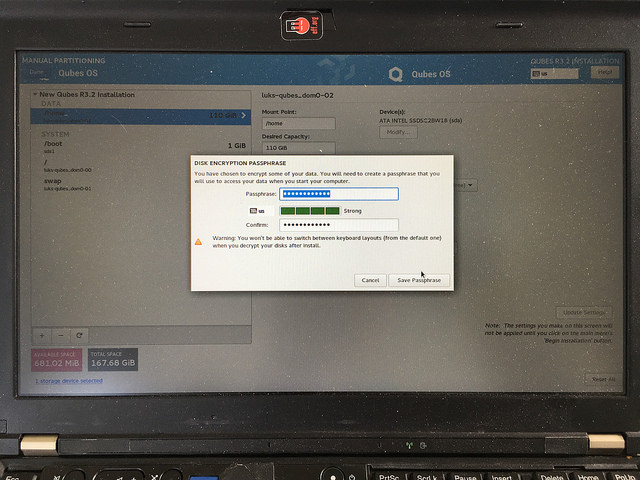
The Disk Recovery Key that you enter here will be used as the “recovery password” later. It should be a long value since you won’t have to enter it very often; only when upgrading the Heads firmware or if there is a need to recover the disk on an external machine. You will need it again shortly, so don’t lose it yet.
Once Qubes has finished installing, you’ll need to reboot and select the ‘Boot menu’ option by hitting ‘m’.
Select the first boot option:
1. Qubes, with Xen hypervisor [...]
Then make this the default boot entry by hitting ‘d’. This will also allow you to seal the Disk Unlock Key if the device supports it.
You will need to input the Disk Recovery Key here (almost for the last time), and this should start the final stage of the Qubes installer. Under Configure Qubes you should select Create USB qube holding all USB controllers so that they are protected from outside devices. This step takes a little while as the templates are configured…
Eventually this will be done and you can click “Finish”, then Qubes will give you a login screen with your login password.
If you choose to add the Disk Unlock Key to the TPM, you’ll need to specify which LUKS volume. A default Qubes install will work if you leave the ‘Encrypted LVM group?’ response blank and enter /dev/sda2 when asked about ‘Encrypted devices?’. For more details see the TPM Disk Unlock Keys section below. You’ll then be asked to enter the Disk Recovery Key as well as the new boot passphrase you’ll use to unseal that key.
To start Heads now (and in the future), just hit ‘y’ for default boot.
This should start the final stage of the Qubes installer. Under ‘Configure Qubes’ you should select Create USB qube holding all USB controllers so that they are protected from outside devices. This step takes a little while as the templates are configured…
Eventually this will be done and you can click “Finish”, then Qubes will give you a login screen with your login password.
After the first reboot, the boot entry will be different post-installation, so after you hit ‘y’ to select default boot you will see a message:
!!! Boot entry has changed - please set a new default
This will also happen on OS updates that changed the boot process (updating the kernel or the initramfs, etc.). If someone has tampered with your /boot partition, this can also happen, so if you’re not sure of the situation, don’t proceed.
Choose the first option again (‘1’), then make it the new default (‘d’), confirm that you’re modifying the boot partition (‘y’), and that you don’t need to reseal the disk key (‘n’). You’ll be asked to insert your USB Security dongle and enter the PIN to sign the new configs and the system will reboot and allow you to proceed as normal.
Installing extra software
sudo qubes-dom0-update
powertop is useful for debugging power drain issues. In dom0 run:
sudo qubes-dom0-update powertop
You might want to make the middle button into a scroll wheel. Add this to /etc/X11/xorg.conf.d/20-thinkpad-scrollwheel.conf
Section "InputClass"
  Identifier  "Trackpoint Wheel Emulation"
  MatchProduct  "TPPS/2 IBM TrackPoint|DualPoint Stick|Synaptics Inc. Composite TouchPad / TrackPoint|ThinkPad USB Keyboard with TrackPoint|USB Trackpoint pointing device|Composite TouchPad / TrackPoint"
  MatchDevicePath  "/dev/input/event*"
  Option    "EmulateWheel"    "true"
  Option    "EmulateWheelButton"  "2"
  Option    "Emulate3Buttons"  "false"
  Option    "XAxisMapping"    "6 7"
  Option    "YAxisMapping"    "4 5"
EndSection
You’ll probably want to enable fan control, as described on ThinkWiki.
Disabling the ethernet might make sense to save power
Boot config files
A user has the option to make persistent modifications to the non-Qubes boot process by creating one or more of the following files:
| file | description |
|---|---|
| kexec_menu.txt | contains multiple options for parameters to the kexec command |
| kexec_hashes.txt | a sha256sum file from within the respective boot directory |
| kexec_iso_add.txt | a sh variable to override the standard ISO kernel argument |
| additions | |
| kexec_iso_remove.txt | a sh variable to override the standard ISO kernel |
| argument removals | |
| kexec_default.$N.txt | specifies the default kexec parameters corresponding to |
| the Nth menu option | |
| kexec_default_hashes.txt | a sha256sum file for the default entry kexec file |
| parameters | |
| kexec_rollback.txt | a sha256sum of the TPM counter contents in the tmp |
| directory | |
| kexec_key_devices.txt | contains a list of “device uuid” combos for all LUKS |
| devices to unlock | |
| kexec_key_lvm.txt | contains the name of an LVM group to activate on boot |
These can be placed in any of the following locations:
| location | description |
|---|---|
| /boot/ | used during internal HD boot |
| /media/ | used during standard USB boot |
| /media/kexec_iso/$ISO_FILENAME/ | used during USB boot from a particular ISO |
| file |
These files are only used if there is an appropriate signature for them in kexec.sig covering all kexec*.txt in that location. This can be generated by running kexec-sign-config -p /boot/, etc. These files are copied by kexec-check-config to /tmp/kexec/ only there’s a valid signature. From there the boot routines reference only the configs in /tmp/kexec.
If there is no persistent kexec_menu.txt, the boot directory will be searched for grub/syslinux-like configurations and it will be generated on-the-fly (for any of the HD/USB/USB-ISO locations). Creating a persistent kexec_menu.txt can be useful to limit the options displayed or to make custom persistent alterations to xen or kernel params.
kexec_menu.txt has a simple layout with a single line per boot option:
description 1|elf|kernel /vmlinuz... |initrd /initramfs... |append ...
description 2|multiboot|kernel ... |module ... |module ...
description 3|xen|kernel /xen... |module /vmlinuz... | module /initramfs...
This is a sample kexec_menu.txt covering the expected options (derived from grub.cfg):
Ubuntu|elf|kernel /vmlinuz-4.8.0-58-generic|initrd /initrd.img-4.8.0-58-generic|append root=/dev/mapper/ubuntu--vg-root ro quiet splash crashkernel=384M-:128M crashkernel=384M-:128M
Memory test (memtest86+, serial console 115200)|elf|kernel /memtest86+.bin|append console=ttyS0,115200n8
Qubes, with Xen hypervisor|multiboot|kernel /xen-4.6.5.gz placeholder |module /vmlinuz-4.4.67-13.pvops.qubes.x86_64 placeholder root=/dev/mapper/luks-UUID ro rd.qubes.hide_all_usb|module /initramfs-4.4.67-13.pvops.qubes.x86_64.img
If there is a persistent kexec_hashes.txt, a non-default boot will fail when the file hashes don’t match the expected values. By default, no such checks are made.
When booting from an ISO file on a USB drive, it must be signed by a valid key in the Heads ROM and the boot process will fail if invalid. The kexec_iso_add.txt and kexec_iso_remove.txt are useful to inject the appropriate kernel arguments to allow it to load properly. ISOs for Debian require that kexec_iso_add.txt contains to load properly:
findiso=${ISO_PATH}
Take a look at https://mbusb.aguslr.com/howto.html for more variations on the distro-specific ISO mounting command lines requirements. By default Heads uses two variants of this when booting from ISO where a kexec_iso_add.txt is not specified:
fromiso=/dev/disk/by-uuid/$DEV_UUID/$ISO_PATH iso-scan/filename=/${ISO_PATH}
Note that currently, any multiboot entry is interpreted as a Xen-variant and kexec-boot overrides the arguments to the multiboot kernel with custom arguments. A user can manually specify multiboot entries to override the default behavior by creating a custom kexec_menu.txt.
If a user wishes to require that file hashes be checked for a succesful non-recovery boot, they may set the CONFIG_BOOT_REQ_HASH=y in their respective Heads config file.
As as convenience mechanism, a user may select a boot option to always be used in the future, assuming that the boot parameters and file hashes have not changed. This can be done by running kexec-save-default manually or directly from the boot menu. This works for any boot location (HD/USB/USB ISO) but does modify the respective /boot/ or /media/ filesystems. An entry index is maintained so that if the options are being derived from the live grub.cfg (i.e. no persistent kexec_menu.txt) and when there is a change to the underlying grub parameters, the boot will fail and require the user to resign/revalidate the settings. This is useful to detect changes to the primary kernel/initramfs (for example in the Qubes case when the primary entry is first).
If a user wishes to require that a TPM counter be set for rollback prevention, they may set the CONFIG_BOOT_REQ_ROLLBACK=y in their respective Heads config file. When this is true, standard boot will only succeed if:
1) Booting from an verified ISO 2) Booting from a mount point that has a valid kexec_rollback.txt in its parameter directory
The simplest way to achieve this is to set a default boot option as this update the rollback counter by default.